One of the questions I get asked most often is what one needs to start tying tenkara flies. The first thing I tell people is to NOT buy a fly tying kit. Kits are a perfect waste of money with just the right combination of wrong-sized feathers, useless colors of materials, and unnecessary tools. While they are marketed as money savers, they actually waste your money by making you buy things you’ll never use and end up spending more to supplement what the kit lacks.
Instead of buying a kit, it’s better target the fly patterns you want to tie, and buy the materials just for those. I have put together this small guide on what you’ll need to get started without spending a lot of money and buying things you don’t need.
Getting Started…
If you’re thinking about learning to tie your own flies, tenkara fly patterns are a great place to start. Like tenkara fishing itself, tenkara flies are simple, practical, and easy to learn. It’s a great way to learn the basics of fly tying before moving on to more complicate Western fly patterns.
Unlike Western flies, you don’t need a lot of materials, tools or advanced skills to tie tenkara flies, which means you’ll be able to start tying your own flies right away with little upfront investment.
In this article, I will cover:
- The basic types of tenkara Flies
- The tools & materials you’ll need to get started
- How to tie two of the most popular tenkara fly styles
Types of tenkara Flies
While there are many different types of tenkara flies, there are three styles that are the most popular and the most iconic of tenkara fishing. One is a dry fly (a fly that floats) one is a wet fly (a fly that sinks) and one is all purpose (a fly that can either sink or float depending on how you fish it.
The main difference between wet and dry flies is that the hackle on dry flies must be stiffer to help the fly float (whereas with wet flies, you want softer hackles that absorb water to help the fly sink and which will move more in the water to give the illusion of life).
Tenkara Dry Flies
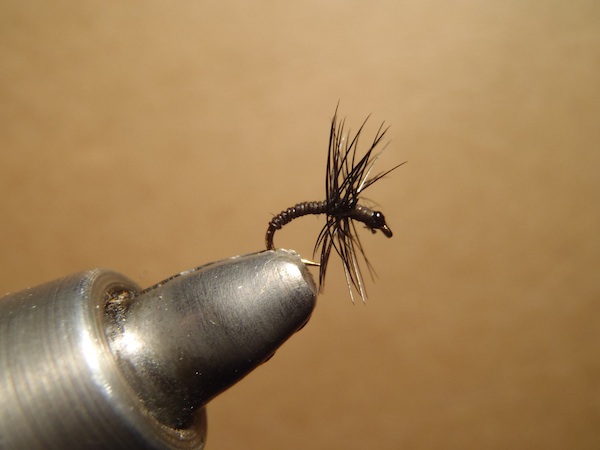
Black Sakasa Gujo Dry Fly
Most tenkara dry flies are Spartan, and lack the wings, tails, and legs of their Western cousins. They are more impressionistic than realistic and work more because of good presentation rather than imitation.
Tenkara Wet Flies
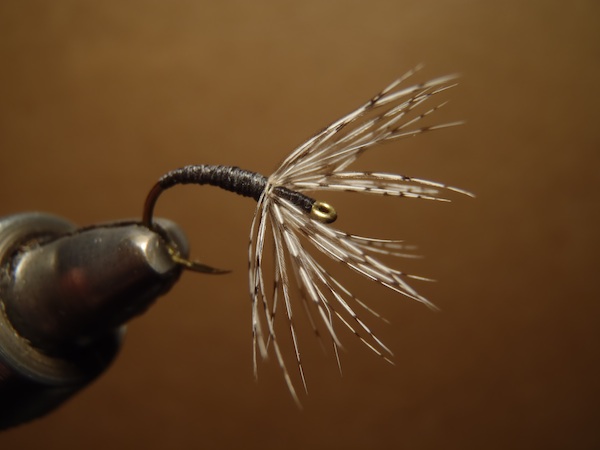
A basic Sakasa Kebari Wet Fly
Probably the most recognizable symbol of tenkara fishing is the Sakasa Kebari (reverse hackle fly). These flies are often made from nothing more than a hook, some thread and hackle (a feather wrapped around the hook). Unlike Western wet flies where the hackle is wrapped so that it faces back toward the hook bend, the hackle on a Sakasa Kebari faces forward, hence the name “reverse hackle”.
These flies are often fished by letting them sink, and then twitching the rod tip to make the hackle fibers open and close, which makes the fly look alive. In Japan, they are often tied on larger hooks (#12, #10, or #8), but can be tied is smaller sizes too (#14, #16, #18). We’ll talk a little more about hook sizes later.
Tenkara All Purpose Flies
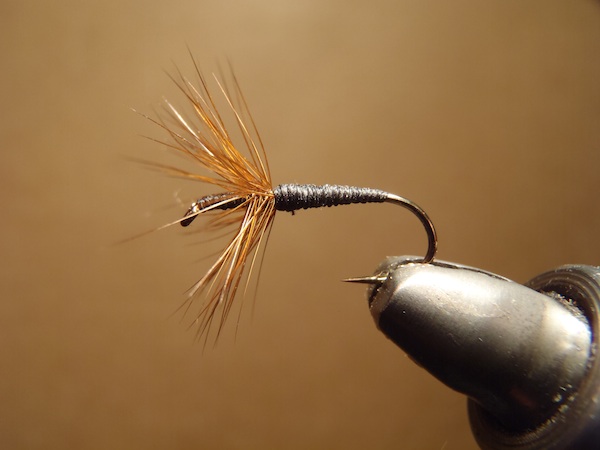
The famous Dr. Ishigaki fly
The most famous tenkara fly is the Dr. Ishigaki fly which is literally nothing more than a black thread body with brown hackle. It can be fished both a dry fly and a wet fly, though its construction is more similar to most tenkara dry flies. Some tenkara fishers only use one fly pattern, often, one that can be fished both wet and dry. Dr. Ishigaki himself usually fishes this pattern as a wet fly though.
Tools & Materials for Tenkara Flies
There aren’t really any special tools specific to tying tenkara flies. The same tools used for tying Western flies are all you need. But because the patterns are so simple, you won’t need as many tools to get started as if you were tying Western flies. Here is a list of basic tools you’ll need and some that are recommended:
Essential Tools
1. Fly Tying Vise
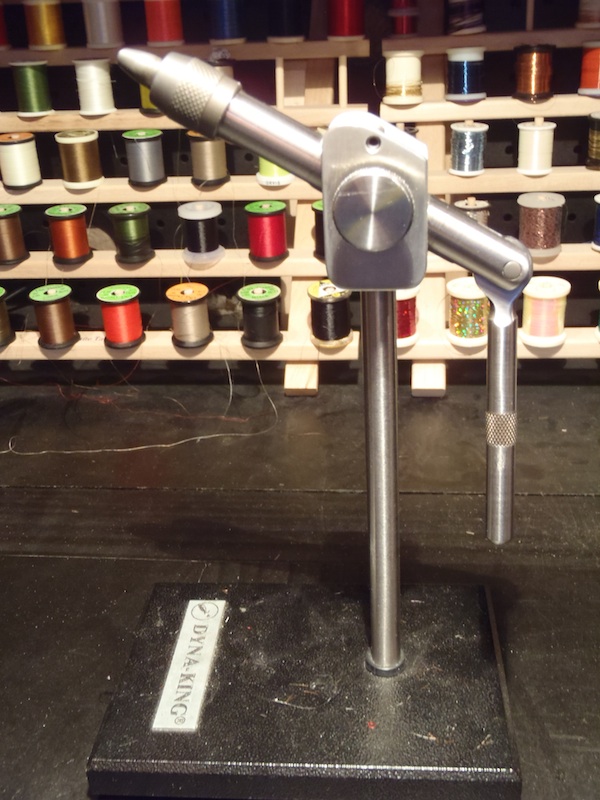
My venerable Dyna-King fly tying vise
The vise holds your fly so you can tie the fly. You may have heard of some people tying flies without a vise and just holding the hook in their hand. This is very difficult and I wouldn’t recommend it for a beginning tier. Trust me, you need a vice.
The vise will be your most expensive upfront investment but it will last you years and will easily pay for itself with the money you save from not having to buy flies.
There are a lot of good vises out there and a lot of terrible ones. Buy the best one you can afford. You can get a decent one for $40-$50. Look for one that has adjustable jaws to accommodate different hook sizes.
2. Bobbin
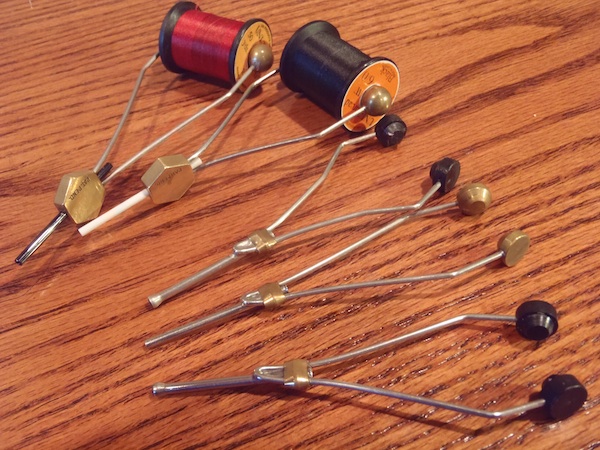
Various styles of fly tying bobbins
All flies are tied with thread and you need something o hold the thread under tension while you tie. That’s what the bobbin is for. I’d recommend a ceramic bobbin and they are more durable and won’t fray the thread over time.
3. Scissors

Fly Tying Scissors
No, you can’t use the big, orange-handled scissors in your junk drawer. Well, you could, but life is a lot easier with real fly tying scissors. Ordinary scissors are too big and clumsy to work well for tying flies. Fly-tying specific scissors have thinner blades and finer points that will allow you to more effectively cut off excess material from your flies.
Optional Tools
1. Bodkin
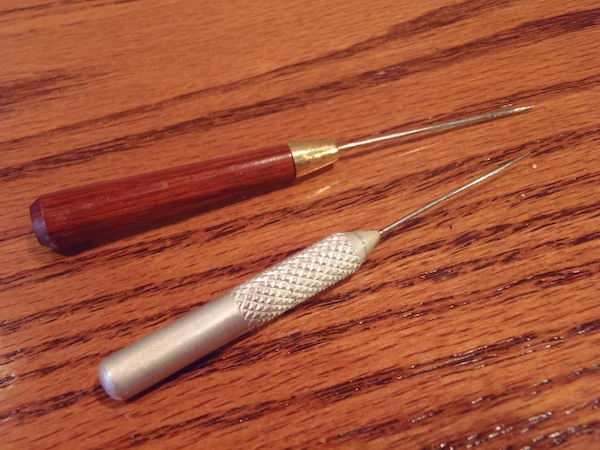
Fly Tying Bodkins
The bodkin is a very useful and multipurpose tool. It’s essentially a needle with a handle. Its main use is to add head cement to you flies (glue that you put on the thread to keep the fly from coming apart). Many fly tiers do not use head cement at all. But if you do, you will need a bodkin to apply it. They’re cheap and you can even make one yourself by sticking a thicker sewing needle into a handle such as a wine cork or a wooden dowel.
2. Whip Finisher
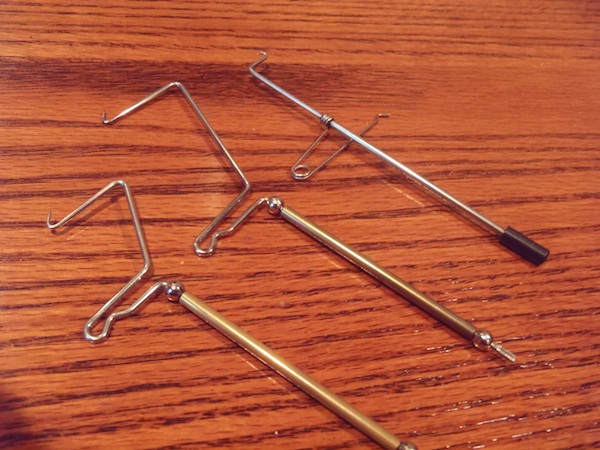
Some different types of whip finishers
When you’ve finished your fly, this clever tool ties a special knot in the thread to prevent it from unraveling. It’s convenient, but certainly not necessary. There are other methods that you can use to finish your fly by hand such as using a series of half hitch knots. You can even make your own half hitch tool out a pen case:
I prefer a whip finisher because if your skin is rough, finishing the fly by hand can fray or break the thread and it is easier to finish off flies behind the reverse hackle which many tenkara fly patterns use. Plus, it just forms a neater looking knot.
3. Hackle Pliers
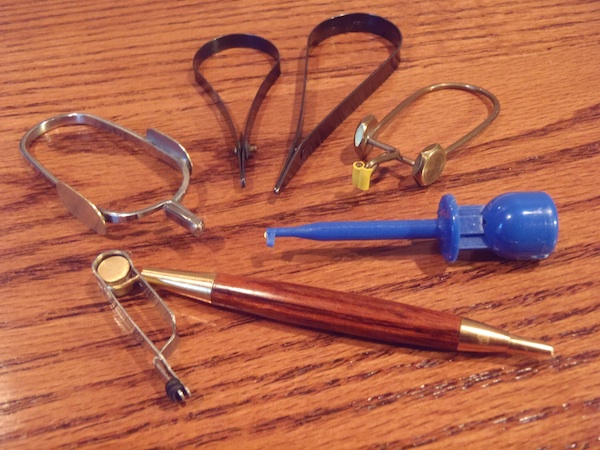
Hackle Pliers
Hackle pliers are small clamps that hold your hackle and make it easier to wrap around the hook. Longer feathers can just be wrapped by hand. But with shorter feathers (the kind often used in tenkara wet flies) it’s nice to have hackle pliers. Look for ones that have a rubber coating inside the jaws. These grip the feather better and prevent it from slipping out of the pliers.
Tenkara Fly Tying Materials
Now that you’ve got your toolbox put together, you need to assemble you building materials. While there are literally thousands of different types and colors of fur, feathers, and synthetic materials, you can get started tying tenkara flies with an astonishingly small amount and still produce great looking flies that will catch fish.
Instead of buying all the materials you think you’ll need, a better strategy is to let the fly patterns drive your purchases. That is, pick out the pattern or patterns you want to tie, and just buy the materials for those. Then, figure out what pattern you want to tie next and just buy the materials you’ll need for that one. As you go, you’ll see that some of the materials you’ve already purchased can be applied to new patterns and that as you build your supply of materials, the less you’ll have to buy every time you want to tie a new pattern.
Covering the whole range of fly tying materials available is far beyond the scope of this article. Instead, I have put together a list of versatile materials that will allow you to tie a variety of traditional tenkara flies. You can always pick up new materials and experiment as you go.
1. Hooks
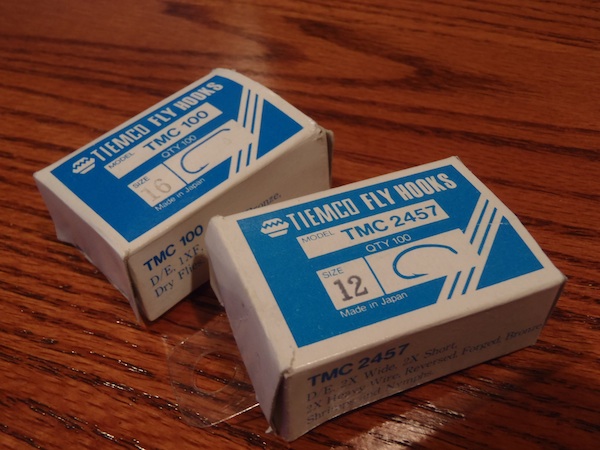
Hooks for tenkara fly tying
There are basically 3 things you need to consider when buying hooks: size, shape, and weight.
Hook Size
As I mentioned above, many Japanese fly tiers use fairly large hooks. American anglers typically find smaller flies more effective. In general, I’d say that the most useful hook sizes are #12, #14, #16, and #18 (like thread, the higher the number, the smaller).
If you’re just starting out, you probably don’t want to buy a huge selection of hook sizes. And, the smaller the hook, the more difficult it is to tie on. I’d recommend starting out on a #14 hook because it’s big enough to make tying easier for a beginner, yet small enough to represent a variety of insects that fish will find appealing.
Hook Shape
Again, there are many different hook shapes that I can’t go into here, but we can narrow it down to two for the sake of simplicity: straight and curved. You’ll notice that many tenkara flies are tied on curved hooks but you can also tie them on straight hooks. I prefer curved just because they look “buggier” to me.
Hook Weight
Obviously, you’ll want your dry flies to float and your wet flies to sink, so this means you’ll need different weight hooks if you’re tying both. Dry fly hooks are thinner and lighter, while wet fly hooks are thicker and often have designations such as “1X heavy” or “2X heavy”.
Recommended Hooks
To begin with you only really need one size, shape and weight of hook. But as you go, you’ll eventually want to pick up different hooks as you gain more confidence in your tying skills and want to experiment more. When you do, here are my recommendations:
Tenkara Dry Fly Hooks
Straight: Tiemco 100
Curved: Tiemco 2457
Tenkara Wet Fly Hooks
Straight: Tiemco 3761
Curved: Tiemco 2457
2. Thread

Thread for Tenkara Fly Tying
Many tenkara fly tiers use sewing thread. Since they’re often using thread to form the bodies of their flies, it makes sense to use this thicker thread to build up bulk quicker and easier. This is great for thread-bodied flies, but for flies that use other materials for bodies, I prefer thinner fly tying thread to avoid getting too bulky.
Fly tying thread comes in different thicknesses and has its own rating system. 6/0 is considered “standard” by many, while 8/0 and 12/0 are thinner. The higher the first number, the thinner the thread. So, for example, 3/0 thread would be very thick. 6/0 is probably the best all around choice as it’s thin enough to work well with different body materials, yet thick enough to build thread bodies without requiring a million wraps and giving you carpal tunnel syndrome.
There is a vast spectrum of thread color available, but you could get by with just one color: black. If you want the thread to match the color scheme of your pattern more, then you might want to get a few colors. You don’t have to get an exact match. A mixture of black, brown, and grey thread would cover most patterns.
If you do a Google image search for “tenkara flies”, you’ll see that many patterns use a contrasting thread color before the hackle behind the hook eye. This isn’t necessary and probably doesn’t affect the effectiveness of the fly, but it looks neat. To start, you could easily just use one color thread. But eventually, you might want to pick up some red, orange, or chartreuse thread to get a little more creative with your flies.
3. Hackle
I’ve already defined hackle as, “a feather you wrap around the hook”, but now it’s time to flesh that out a little as there are many different types of hackle with different qualities.
Dry Fly Hackle
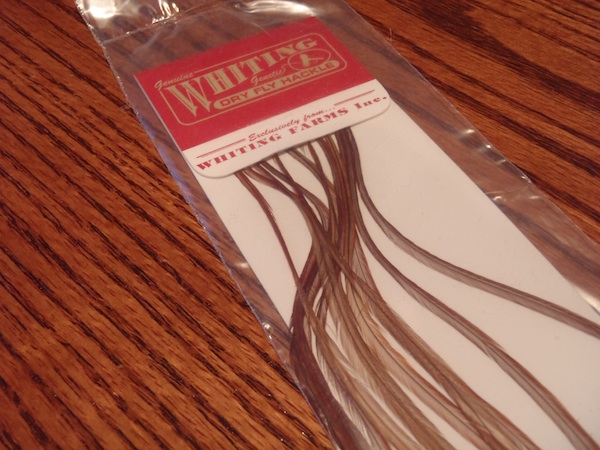
Dry Fly Hackle for Tenkara Flies
For dry flies, you’ll want stiffer hackle that will prop the fly up on the surface film of the water and help it float. Like hooks and thread, hackle also comes in different sizes. The hackle size is described the same as the hook size. So, for a #14 dry fly hook, you would use a #14 hackle.
Traditionally, tiers bought an entire “neck” (of a chicken) that had a wide variety of sizes. The tier had to go through a bunch of different feathers and use a gague on each one to find the right size.
Today, chickens are genetically engineered to produce more consistent, more useful, and less wasteful hackle. Whiting Farms takes the guesswork and expense out of finding the right hackle with their 100 packs. Each package contains only feathers of a specified size and is guaranteed to tie at least 100 flies making them a great value. Plus, the size of the hackle is consistent from the tip to the butt meaning you can use the entire feather. This is probably the most convenient and most economical choice for the beginning fly tier.
As for color choices, the most versatile are brown, grizzly, and dun (gray). Again, you can go crazy with color but I think these three will give you the most flexibility and allow you to tie a variety of dry flies without spending a lot of money.
Wet Fly Hackle
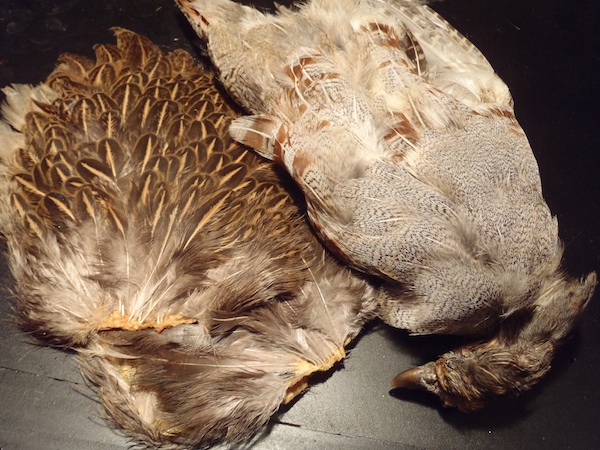
Speckled hen (left) and partridge hackle (right) for tenkara wet flies
Wet fly hackle is completely different from dry fly hackle and comes from different birds. There are many that can be used but probably the two most common are hen pheasant capes and partridge feathers.
Hen pheasant capes are relatively cheap and come in a variety of colors. More natural colors like browns and grays are probably the most versatile. The only problem is that the majority of useful feathers (in terms of size) tend to be limited.
Partridge feathers have nice patterns on them that just make flies look buggier. If you think you’ll be sticking with fly tying and want the most long-term economical source of wet hackle, it’s probably worth it to buy an entire partridge skin. This will not only give you a broad range of feather colors and variegations, but also a lifetime supply. I have been using the same partridge skin for years.
4. Peacock Herl
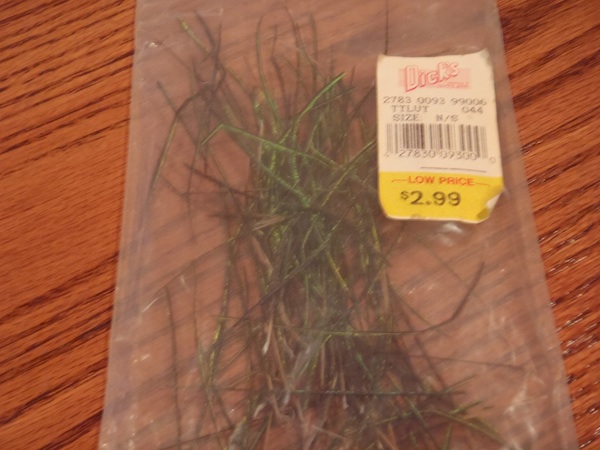
Peacock Herl
Peacock herl is a magical material that can be used on a variety or wet and dry flies. It can be used to form the entire body of the fly but in tenkara fly tying, is often wrapped just behind the hackle of wet flies. With it’s black and green iridescence, peacock herl is well known for it’s fish catching abilities.
Want to experiment a little more?
You could stop here and get started tying tenkara flies with a handful of the materials above. But if you want to take it a step further, read on…
Dubbing
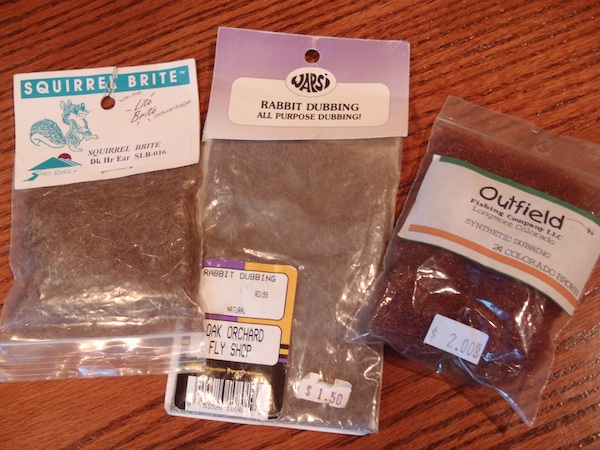
Natural, synthetic, and blends of dubbing
Dubbing is basically chopped up fur or some synthetic material that you twist on to the thread, then wrap around the hook to form the body of the fly. As I mentioned above, many tenkara fly tiers simply use thread for the body. But if you want to try some different variations, dubbing is a good option.
There are too many natural and synthetic dubbings to cover here but it’s always safe to go with earth-tone colors like black, brown, olive, tan, etc. Start with one, learn the technique, and then you can begin to play with different colors.
I like to use dubbing on my wet flies because it absorbs water and helps the fly sink faster.
Wire

Fly Tying Wire
If you want to get a little fancier, you can buy a couple of spools of wire. Wire is wrapped around the bodies of wet flies to give them more durability, a segmented look (like a real insect), and add a little weight to help the fly sink. The traditional colors were gold, copper, and silver, but today, you can buy wire in almost any color, giving you a lot of room for creativity. Wire also gives your flies a little flash and seem to get the fish’s attention.
How to Tie Tenkara Flies
Now that we’ve gone through some types of tenkara flies and materials, let’s look at some examples of how they’re all put together. Keep in mind that these are just some examples to illustrate basic tenkara fly tying techniques. You could easily substitute materials and colors to produce a variety of different patterns.
The Dr. Ishigaki Fly (dry/wet fly)
Hook: Tiemco 100 #14
Body: Black 6/0 Uni Thread
Hackle: Brown Dry Fly #14
1. Start the thread behind the hook eye and cut off the excess. Build a small head of thread about 1/4 of the way back to the hook point.
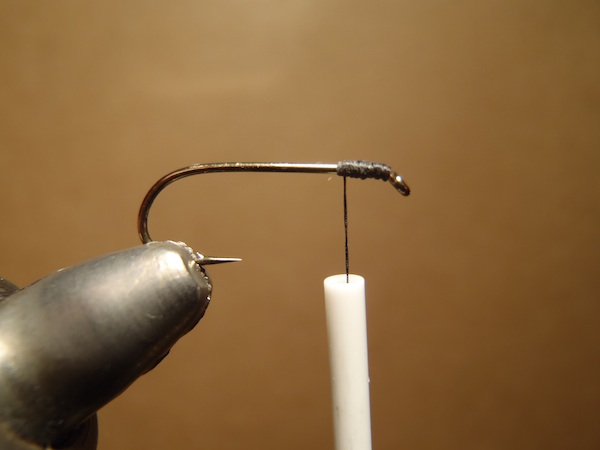
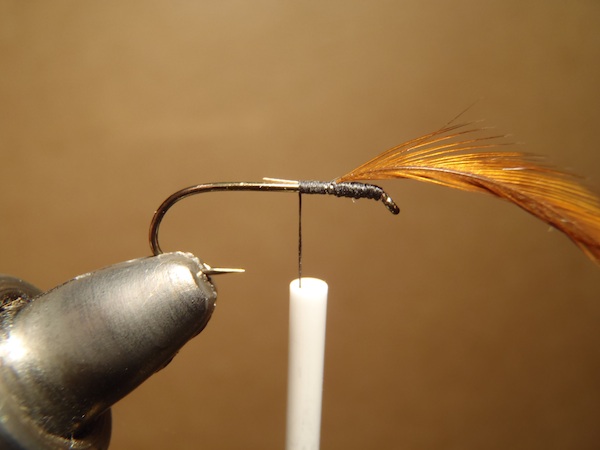
3. Tie in a brown hackle feather so the curved, dull side of the feather is facing the hook shank. Wrap the thread back toward the hook bend a few times. This is where you will later tie off the hackle.
4. Wrap the hackle 4-5 times around the hook back toward where you stopped the thread and tie off. You might accidentally trap some of the hackle with the thread but that’s OK. We’ll correct this in the next step.Cut off the excess hackle.
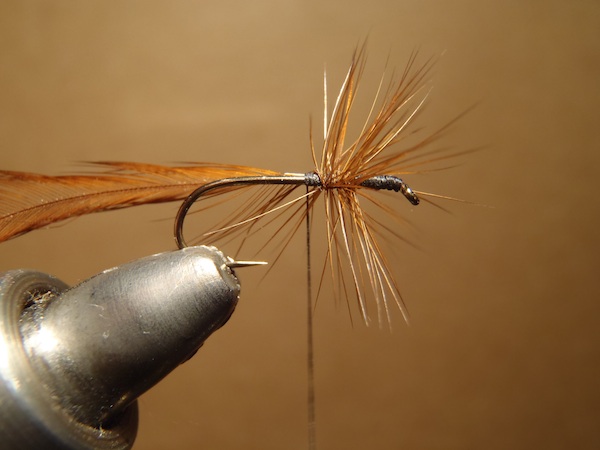
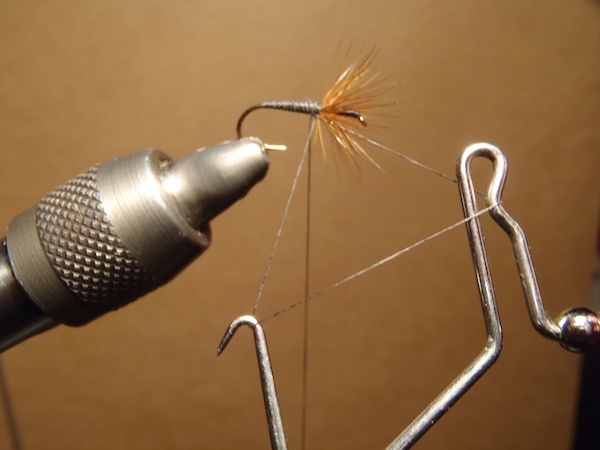
5. Grab the hackle fibers and sweep them forward over the hook eye. Make a few wraps of thread behind and over the hackle to lock them in a forward facing position.
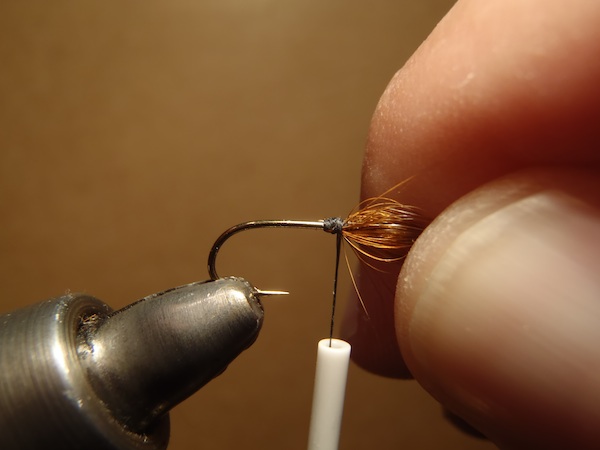
6. Build a tapered body of thread along the hook. It should be thinner toward the bend of the hook and thicker closer to the hackle. Don’t make it too thick. Slimmer is better. Return the thread to just behind the hackle.
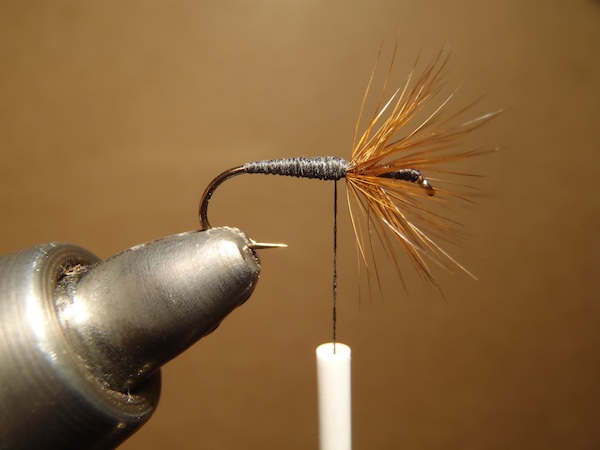
7. Us your whip finisher to finish the fly just behind the hackle. Four or five wraps with a whip finisher is all you need.
8. Cut off the excess thread close to the body and you’re done!
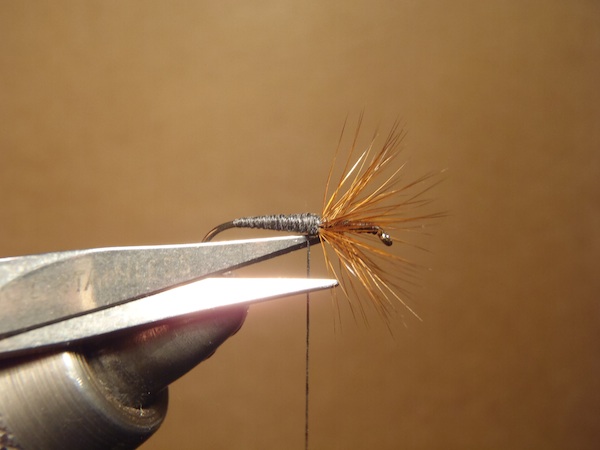
9. Your finished fly should look something like this. Don’t worry if it doesn’t look exactly like this. tenkara flies don’t place a lot of emphasis on precision and proportion. Even if your fly only remotely resembles this, it will still catch fish. Nice job!
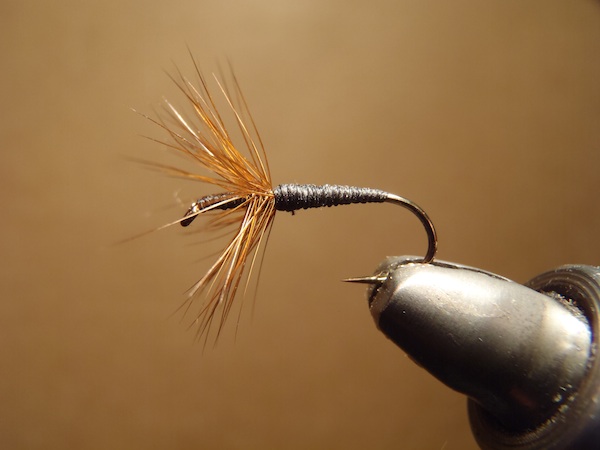
Sakasa Kebari (wet fly)
Hook: Tiemco 2457 #12
Thread: Uni 6/0 (your choice of color)
Hackle: Hungarian Partridge
1. Start the thread just as we demonstrated above with the Dr. Ishigaki fly, clip off the excess, and build a small head of thread.
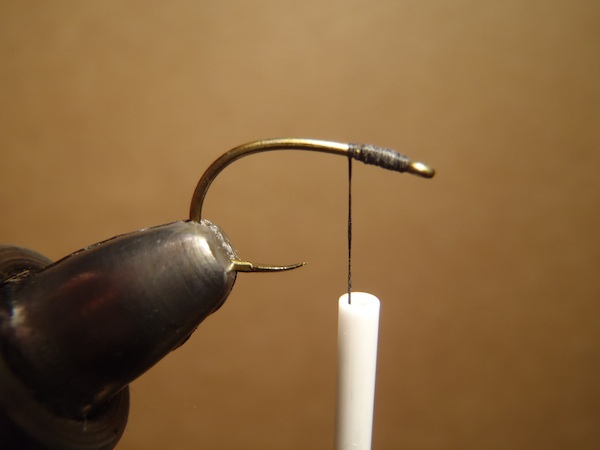
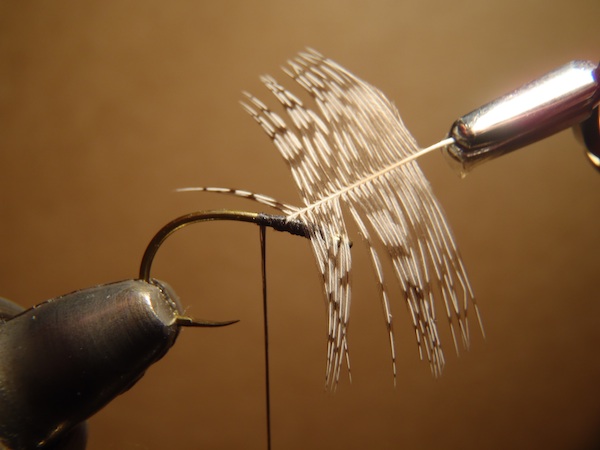
2. Tie in one partridge feather by it’s tip so that the curve of the feather is facing the hook shank.
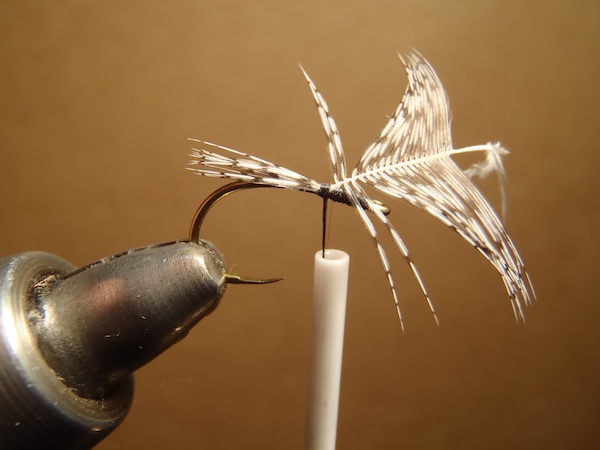
3. Clip off the excess feather and wind the thread back toward the hook bend a little to give you room to warp the hackle. Here is an example where it’s handy to have hackle pliers. Partridge feathers are short and can be difficult to wrap by hand. If you have hackle pliers, grab the stem of the partridge hackle.
4. Make three to four wraps of hackle back toward the hook bend to where you stopped the thread. Tie off the hackle and clip off the excess.
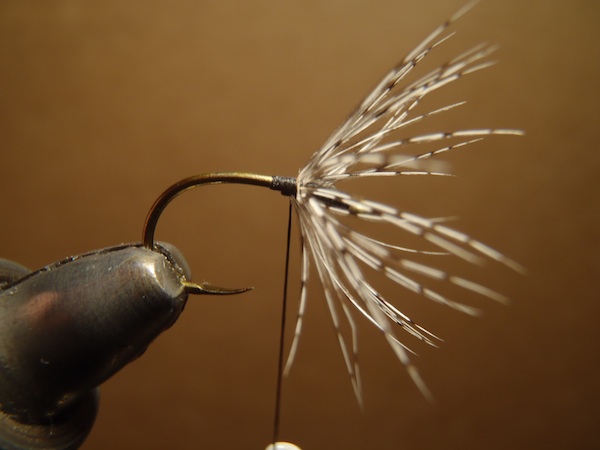
5. Build a tapered body of thread and whip finish behind the hackle as we did in the example above of the Dr. Ishigaki fly.
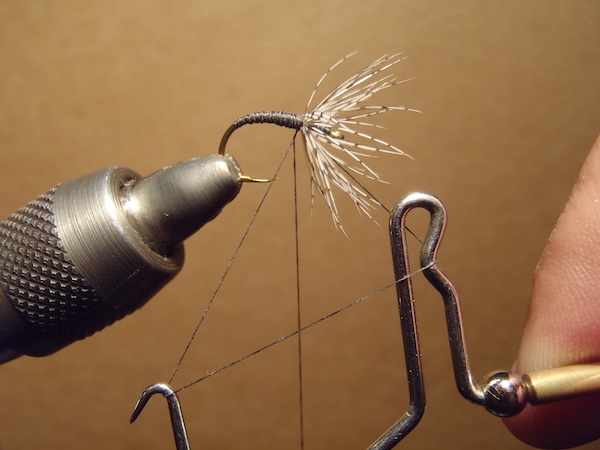
6. Trim off the excess thread. That’s it! Your fly should look something like the picture below. Don’t worry if it doesn’t look “perfect”. The effectiveness of this fly depends on the movement of the hackle in the water, not how well it’s tied.

Conclusion
Tenkara flies are the perfect flies to start learning fly tying. They will teach you the essential skills that you will need to tie more complex patterns later and are fun and easy to experiment with.
With the tools, materials, and techniques above, you will be able to start tying tenkara flies that will actually catch fish. I can’t think of anything more rewarding than catching a fish on a fly you tied yourself (you’ll see what I mean the first time you catch a fish on one of your own flies). Even though I have been fishing my own flies for over 20 years, I still feel a great sense of accomplishment on every single strike. I hope you will too–beyond the next 20 years.




This is great! I have a ‘hand me down’ box full of fly tieing stuff (in a very old wooden crate, full of random feathers/dubbing/assrted threads and tools), but have never used it as thought it would be too difficult. After reading this post, I pulled it out this afternoon and in about an hour had tied my first ever flies, 3 Dr. Ishigaki flies. The first two were pretty ugly but the third was a lot better!
One question, regarding the size of the hackle. Is there an easy way to pick the right hackle size? I pick a feather out, but invariably my hackle, once tied on, looks massive on the no. 14 hook. Is it a matter of picking out the smallest hackle you can find?
Hi Todd, that is great to hear! You’ll be even more excited when you catch your first fish on one of your own flies.
As for sizing up the hackle…a general rule of thumb is that when you wrap it around the hook, the fibers should extend about 1/2 of the hook gap beyond the hook point.
I’m not sure if that’s clear so let me say it another way. When you wrap the hackle around the hook shank, the fibers should be 1 1/2 times the length of the hook gap.
Does that help? You can buy hackle gauges but I usually just use the technique I tried to describe above or just buy the pre-sized Whiting hackles I recommended in the article.
Tenkara flies are nice because proportion isn’t really emphasized too much so even if your hackle is a little big, the flies will probably still catch fish.
Enjoy and let me know if you have any other questions.
Waiting for, “Tying Tenkara Flies, volume 2”? Any idea when it will be for sale?
Hi Carl. I’ve got far more interesting things planned. 🙂
Jason, this is amazing. Great article. As a long-time angler but newbie to both tenkara and fly-tying this is exactly what I needed.
And oh… the Trico pack is perfect.
Thank you!
Hi Ben,
Thanks, glad you like the Trico! I’m heading to Mt. Whitney on Sunday and just loaded up my Trico to hit some high-altitude lakes. Really excited.
Jason, Thanks for the detailed topic. I have been meaning to call you about the same thing but I have been working a lot. I did get a chance to spend 4 days in the sierra’s. up McGee creek trail at the Hilton lakes, caught a lot with Yamame rod and I didn’t feel an extra ounce in my pack. Thanks for the rod “best piece of gear I have ever purchased”
Thanks for doing this tutorial. I love the simplicity of these flies.
Just great…
Great article often fancied making my own Flies .
This has got me a step closed to doing it.
Thanks, Jason. This confirms my after-the-fact conclusion: buy whatcha need when you need it. Decades ago, I bought a “kit”. I haven’t used the hair stacker. I think I could sell it to a urologist for use circumcisions 🙂
I just made this fly .
Good looking fly Jeff! If you count all the tools it took to make that one, that’s probably all you need for tenkara flies.
I have been taking ” over the shoulder” lessons from a 75 yo gentleman with bad hands. My first fly was a nymph. UGLY, it looked horrible. Well “Pops” showed me a tenkara fly and i fell in love with the simplicity and the action in the fly. Imagination goes a long way with this fly. Love this site it is truely helpful. THANKS!
Wow. You could have packed this up in a pdf file and sold it. Thanks so much!
Hi Joaquin, thanks. I’m glad you found it helpful! Comments like yours are more valuable to me than money. 🙂
Jason,
I want to thank and complement you on your well written and useful article. As well as other great articles on Tenkara talk.
As a novice tier who gave it up for many years and have recently returned, I want to partially, and humbly, disagree with some of your article.
Upon returning to fly fishing I walked into a shop and even with the small amount of experience in tying I had was completely overwhelmed with the items to choose from and the cost of some of them. It seems like stores only offer top of the line (or at least charge top of the line prices) for items offered ala cart. In looking at a few tying kits, most of them absolutely horrible, I did find I could purchase an inexpensive kit that is more than adequate for my needs for around, or even less than, the price of the cheapest tying vice they offered. While the quality is not the best, I think the value of a starter kit is in helping to eliminate the stress of trying to choose among the plethora of devices and materials available, thereby making it easier for new tiers to get started (an intro to tying class would probably do a better job). There is no doubt in my mind that were it not for the availability of affordable and (somewhat) complete starter kits, there is no way I would have started tying, and never have experienced the joy of catching a fish on a fly that I myself had tied.
So while I agree that most kits are garbage, and most tiers will soon outgrow (and/or not use) much if not all of the items/materials, if they successfully introduce someone to tying, then I feel the money was well invested.
Hi Dave, you make some really good points here. But I still think the better approach is to first figure out which patterns you want to tie, then just buy the materials for those based on the advice of an experienced tier and continue to build your inventory from there. Eventually, you’ll get overlap in the materials you need, driving the cost down and get better ROI than a kit can provide. My main problem with kits it that they just throw a random collection of materials together and you end up with 3/4 of what you need to tie a pattern you want so you end up having to buy more materials anyway. Rather than approaching it from a materials standpoint, I think it’s better to first consider the flies you want to make and then buy the materials based on that. Having the hindsight now, that’s what I would recommend. But, I agree with you that if kits (no matter how terrible they might be) get more people into tying, then that’s a good thing. Even if they have to throw a little money away at first.
This is perfect Jason. Just what I need to lead fly tying for our group tonight. Thanks for the specific detail!
Dang, Jason.
I attended a couple of basic fly tying lessons with Granite Bay Flycasters club in Calif. and learned how to use a whip finisher, tie a half-hitch, etc.
Your illustration and instructions above on how to attach hackle is SO simple and it works! I’m off to get a few Tenkara hooks and some hackle and then I’m in business.
OH! and I just purchased some of the two-ply yarn that you mentioned by Jamiesons Shetland Spindrift yarn and I’m really excited to try it for Tenkara flies. (your page here for others that want to see: https://www.tenkaratalk.com/2019/04/yarn-tenkara-flies/
Your easy and common-
sense postings are incredibly valuable and really follow the spirit and simplicity of Tenkara Fishing. Thank you – whenever we someday, somehow meet, coffee is on me.
Hi Chris, thanks so much for the kind words! I’ll take a quad venti latte. 😉