If you’re anything like me, you’ve accumulated a bunch of level lines that live in anonymity. You’ve long forgotten the size and have no idea what the length is. And they all start to look the same after a while. Rather than getting the micrometer and measuring tape out every time you uncoil a mystery line, here’s a simple system you can use to instantly identify any level line’s length and diameter.
Some of you may have seen the post I did about using paint markers to color level lines where I promised I would follow up after some field testing. I finally had the chance to test them out on the water and while the results were not what I hoped, the experiment lead to the idea I’m about to describe.
But first, about the failed experiment. The painted lines looked great in my yard but on the water, they just weren’t as hi vis as I thought. In fact, standard orange fluorocarbon or the new nymph lines from Rigs are much more visible. My tests also answered the question of durability. After only a couple of hours of casting, the paint started flaking off the line. Since it takes a fair amount of effort to paint (and repaint) a full line and they’re no more visible than naked hi-vis fluorocarbon, I don’t see any reason to pursue this idea; however, it did give me another one.
A long time ago, I wrote about a marking system to identify the diameter and length of Tenkara level lines. It involved using a Sharpie marker and color coded Dacron loops. The system was ok but had a flaw. I don’t use Dacron loops on all my lines (and many others don’t either). The marker doesn’t really take well to the fluorocarbon so I marked the loops because they absorbed the ink better. But I really wanted a way to mark the lines directly–loop or no loop. And I think the paint markers might be a better solution
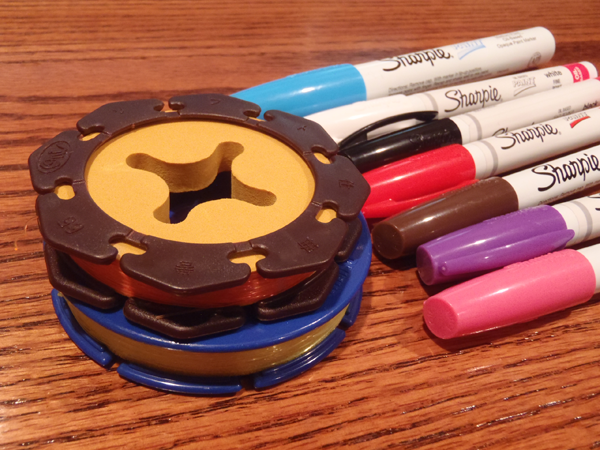
The system is pretty simple and has two components. The first is color coding to indicate the line’s diameter. You could assign any color you want to each diameter but here is what I came up with:
Pink = #2
Brown = #2.5
White = #3
Blue = #3.5
Black = #4
Red = #4.5
Purple = #5
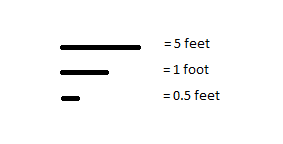
The second component is a set of three bars of different size that indicate the line’s length. It works a little like Roman numerals–they’re combined and “added up” to calculate the length:

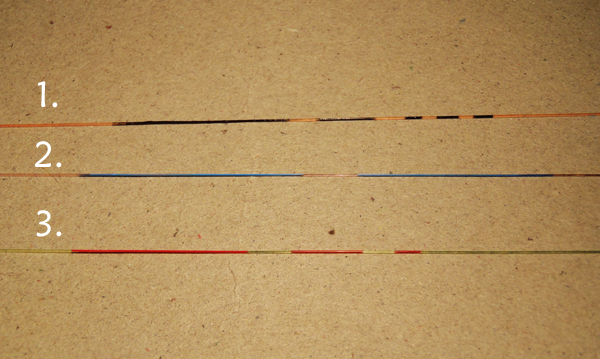
Below are some examples. Can you guess the size and length of these lines? Give it a shot then scroll down to see if you got the correct answers …

Answers
#1 is a 18 ft. size 4
#2 is a 20 ft. size 3.5
#3 is a 16 ft. size 4.5
How did you do?
I think this system is a big improvement over the old one. Even though the paint will eventually wear off, it’s much easier to repaint a few inches than an entire 20 ft. line. To help the markings last longer, I make them at the end of the line where I connect it to the rod (not at the business end where you attach the tippet). This part of the line receives less wear and tear than the tip and is the section you wrap last on the spool so is more accessible (otherwise, you’d have to unwind the entire line to find out what it is).
You might ask why I don’t just mark the spool rather than the line and just dedicate one spool for each line. The reason is that I have many more lines than spools and sometimes I store them off the spool in a plastic bag. Plus, spools get mixed up and any AWOL line not on a spool could not be identified. Therefore, I think it makes more sense to mark the lines directly.
So far, I like this system. But everything can be improved and I’m sure it will evolve again. And when that happens, I’ll be sure to let you know.


Great post Jason! This one isn’t for me though unfortunately. I only carry a few lines and When I set them up I go by arms lengths. So the two lines I always carry are: 4 arms length of #3.5TUSA hi-vis and an arms length of tippet, and #3 bi-vis TenkaraBum line that is 3 arms length and an arms length or tippet. Also by arms length I mean from one hand to the other at a comfortable distance from eachother (It’s about 4′ or so). This way when I unwind the spool and just count the arms lengths, and only carrying my usual 2-3 lines certainly helps as well.
Just getting started in Tenkara, I have only a handful of spools and lines. My few spools and lines are currently unmarked. Since we’re in the off-season here in WI, I haven’t fished in 3 months and just realized over the weekend that I’d forgotten what lines and tippets I have on various spools. So, I was just going to post this question.
Anybody have a rewrite able or removeable system to go directly on the spools?
Jeff, you can use a regular Sharpie. When you want to erase it, wipe it off with a paper towel or cotton ball and some denatured alcohol.
Adhesive office labels work great just cut them to fit. Another and better method I’ve used is a label maker, mine is the Brother. I use it on the smallest font setting. This works very well, again just cut them to fit. They stick great and come off with no residue left behind.
JD
Oops..I didn’t mean better as in better than everybody else’s method. I meant the better of my two. Office labels are paper and will smudge and wear off when wet, where as the Brother labels are a type of I’m guessing thermal plastic or something like that. The letters wont wear off or smudge when wet.
JD
In Japan, the line spools actually come with labels like this:
https://www.tenkaratalk.com/wp-content/uploads/2011/07/Tenkara-bum-spool-stickers.jpg
Not sure why they don’t here.
They do come with stickers here. Every spool I send out comes with two stickers.
here’s an thought – you could use the roman numeral system. If you use a longer band for X and short band for I, you can then mark the line with a plain black permanent felt marker and mark your length and line weight. More durable than paint markers (as in permanent – note!).
I’ve been using this system on western lines (at the backing end) for many years, and my practice casting lines have distances marked every 10feet in roman numerals this way.
C
Yes but in my experience, regular felt tip markers don’t stick to fluorocarbon. Have you had it stick?
Thanks guys. Lots of great ideas. I’ll give some a try. Now I won’t have to try and memorize all my spools contents. Getting too old for that method.
I’m experimenting with a labelmaker that shows great promise but cannot figure our how to upload a photo. Process is a bit tedious but grat results! Tech challenged, sorry!
Hi Jason,
Sorry, I’ve fixed it. Under the red “Submit Comment button” you should now see a great button to upload images. I would love to see a picture.
I label the gaps on the spools with the distances of line that I have (short, 10-12, 14-16, long). The lilian end of the line goes at that gap. So, if I take a 10′ line off of my rod and put a 14′ line on, I can put the 10′ on the same spool, just with a different starting point.