I’ve been making a lot of my own Tenkara level lines lately and I’ve noticed small problem: they all look the same.
At first, I tried putting them on Tenkara USA blue spools and marking the spool with a Sharpie marker to indicate the line’s diameter and length. Of course, I ran out of spools pretty quickly and found that I didn’t like permanently marking the spools because I don’t want to dedicate one spool to a specific line.
I could use the usual small ziplock bag and slip in a card marked with the line’s info. but I often carry lines in the field without the bags so I wanted a system that would mark the line directly so it could always easily be identified.
Line Marking Solution
The system I came up with is pretty simple. It basically involves just marking the line with a Sharpie marker and using different colored dacron for the braided loop connector.
The different colors of dacron indicate the line’s weight/diameter as follows:
Yellow = Size 3 (0.285mm)*
Orange = Size 4 (0.330mm)*
White = Size 5 (0.370mm)*
This allows me to visually identify a line’s weight quickly.
* Note: there is some leeway on which size corresponds to which diameter. These diameters are based on the Tenkara Bum lines and other lines may vary. This is meant only as a rough guide and you can come up with your own marking system.
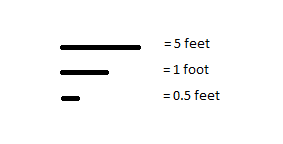
Next, using the Sharpie marker, I use a Morse Code-like system to indicate the line’s length. The marks are as follows:
Simply add up the marks (kind of like Roman numerals) to determine the line’s length. Here are some examples to show you what different line lengths would look like:

I find it’s best to mark the line where the marks will be visible while the line is coiled up or wound around a spool. Generally, this means on the braided loop since this is always sticking out when the line is stored. Of course, you could also mark the line at the end where the tippet connects but I find it’s easier to read on the braid.
Tip: Use an older, “dried out” Sharpie marker. The ink from new ones will run between the braids of the dacron and make it difficult to make make clear marks. Believe it or not, the lower ink flow of a well-used Sharpie will allow you to make more clearly delineated marks.
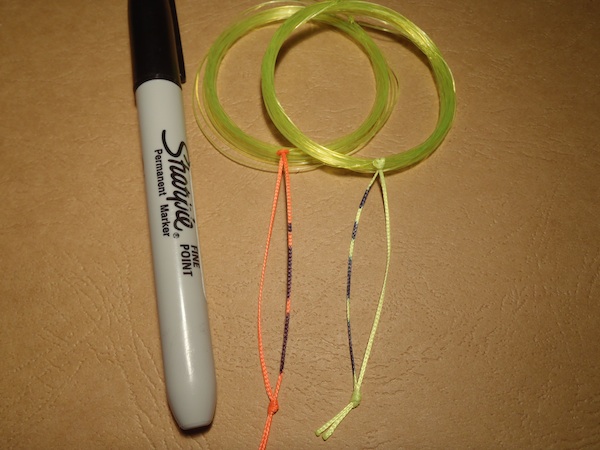
Here are two different lines that would normally look identical. Can you tell which different lengths and diameters they are using my marking system?

Now, I never have to worry about confusing lines again. Whether they’re wound up on a spool or simply coiled up in a pocket of my fishing pack, I will always be able to tell which line is which.
What system do you use for identifying your lines?


very cool idea, I saw the same type of system on “Western” fly lines rigged on spools.
I use a leader wallet and divide each pocket with a card, creating double the space. A leader wallet with 10 lines is about as thick as a T-USA spool. If I go ultralight, I have the line rigged on the rod with EZ keepers and a spare one in small plastic baggie.
Cool Karel but you didn’t answer my riddle. What is the length and diameter of each line in the picture above?
I use the same spool marking system as you do. I’m going to change mine to your new system. Your’s is a great idea! Thanks for coming up with it.
Good system, Jason.
I only use 3 lengths 8, 10.5 and 13 feet of furled or level line,so I mark the backing loop with one, two, or three marks respectively.
Hi Kevin,
Thanks! If you have a line system dialed in like that, your system works great. I wanted to create a system that could easily describe any length and diameter but truth be told, I’m like you and really only fish about 3 different lengths (usually in the same #4 diameter).
Do you have any tips for marking dacron with something that doesn’t bleed as much as the Sharpie markers? As I note, older ones seem to work better but I wonder if there’s something out there that can make a more definitive mark and won’t be absorbed so much into the weave of the dacron. I’ve tried the metallic Sharpies but they’re not as bold and kind of hard to see.
Hey Jason;
do these sizes (i.e. 0.285 for a size 3) relate to lbs in flurocarbon?
Yellow = Size 3 (0.285mm)
Orange = Size 4 (0.330mm)
White = Size 5 (0.370mm)
Thanks
Hi Andy,
No, the “3,4,5” numbers are just a rating system used in Japan to give a general idea of diameter. The system isn’t standardized so one manufacturer’s #3 line might be 0.285mm while another manufacturer’s #3 line is 0.287mm. It’s really more of a general guideline to tell you how thick the line is.
Lb. test is a completely different story. Many tenkara level lines might be 16 lb. 20 lb., etc, but again, the lb. test can vary from manufacturer to manufacturer even for the same diameter. Since any line in this diameter range is more than strong enough for trout, lb. test is pretty much irrelevant (and inaccurate). It’s more accurate to talk about the lines in terms of actual diameter. I hope that clears it up.
Thanks Jason, that makes sense.
My system varies from this a bit. While five is still a dash (-), ten is .- while fifteen is .– and twenty is ..- and one of course is just a . since it is placed on the other end of the dash.
I view the dot before the dash as a doubler, so . doubles the – and .. doubles the – twice for twenty. Doubler dots go just inside of the tag end knot, before the dash. Any dots on the other (right) side of the dash designates a one. For 1/2 ft I put a dot on the knot at the line.
As I’m not wanting to buy different colored dacron spools for line weight recognition (so, I’m frugal), I simply mark the tag ends of the braided dacron on the other side of the end knot. Line wt.#2 gets one dot on middle of each tag end, #3 get two on one end & one on the other, #4 gets 2 marks on each. For 1/2 unit designation, I put a dot on the end knot. For a #5 wt. line, I color just one of the tag ends completely black.
This system is easier for me to fit on the line and consequently, I don’t need to find a half-dried marker.
If you don’t like adding the dacron line for a larkshead knot connection to lilian, and would rather stick with the usual overhand slip knot connection to lilian on the level line, I have had success with the following, although it begins to leave the definition of ‘simple’ behind:
Before tying any knots in rod end of level line, thread that end several inches down the coreless center of some dacron backing line, as in like adding a braided loop connector to fly line. This may test your patience, but after sliding dacron sleeve over level line, pull the dacron at each end to tighten over line (like Chinese finger cuffs) and put a drop of superglue at each end of dacron sleeve. This works better with three hands, but I know you can do it alone. You’re a fly fisherperson, right? You’re sooo fly!
Now you can tie your normal overhand slip knot in the end and attach to lilian, and you have the ability to mark end line with a code to know what it is.
I’ve done it, it works, the knot holds just fine on the lilian. I used 30# dacron on 4.5 weight level line. I can see how using 20# dacron on smaller diameter level line might be better, but the degree of difficulty surely rises. In eaither case, a pair of reading glasses for extra magnification, couldn’t hurt. Good luck!